 |
 |
|
Assignment 1 Assignment 2 Assignment 3 Assignment 4 Assignment 5 Assignment 6 Assignment 7 Assignment 8 Assignment 9 Contact Us |
ASSIGNMENT 9: FINAL DESIGNFunctionalityPhotoCat users can browse their photo collections in either a bull's eye view or a more standard grid view. Bull's
Eye View
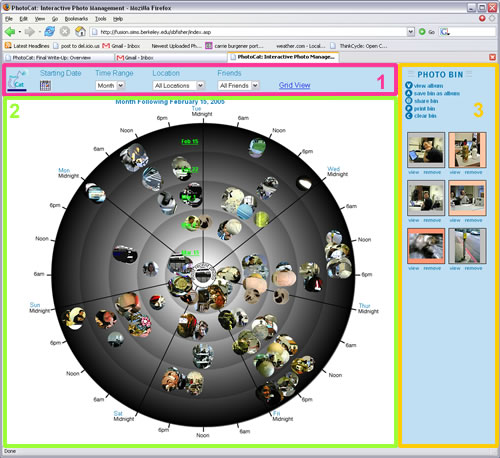
Users can set a time range (Day, Week or Month), which determines what photos appear on the bull's eye. They can specify a calendar day for the start of the time range. The can also use location and friends menus to filter the photos being displayed.
Interaction FlowWhen the user logs into PhotoCat they are presented with their most current week of photos (green below). From that point they can use the filters at the top of the page to change the time frame or the filter the pictures that are displayed (by location or co-present people). The user can also choose if they want to view their photos using the bull's eye view or the grid view. 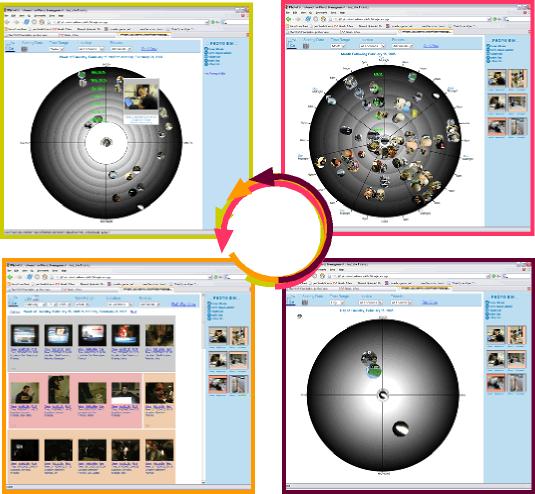 To add a photo to the bin (from either the grid view or the bull's eye), a user can single-click the photo. To remove a photo from the photo bin, the user can click the 'remove' link for that phtoo. Users can view a full sized version of their photos by clicking 'view' under the photo in the photo bin, or by double-clicking a photo on the bull's eye or in the grid view. Users can click buttons at the top of the bin to perform actions on the bin photos. The buttons include: 'view album,' 'save bin as album,' 'share bin,' 'print bin,' and 'clear bin.' All but the global 'clear bin' and 'view album' buttons open new popup windows that allow users to act on the photos currently in the bin. 'View album' opens a window displaying a menu that allows users to select an existing album. View PhotoCat Interaction Diagram Left Unimplemented
Tools UsedPhotoCat was developed using a variety of technological and design tools. Here are the main ones:
|
|||||||||||||||||||||||||||||||||||||||||||||||||||||||||||||||||||||||||||||||||||||||||||
| Paper Prototype | |
| Pros | Cons |
| Quick development | Hard to create images (only had time to do 30) |
| Could use computer rendered images | Thumbnails were not representative size |
| Offered something concrete to test with users | Put us into a non-computer mindset |
| Easy to change layout issues | Couldn't test a fully interactive bull's eye |
Next we created our first interactive prototype using ASP, HTML,
and a Microsoft Access aatabase.
| Interactive Prototype I | |
| Pros | Cons |
| Almost fully functional | Time-consuming to develop |
| Demonstrated the interaction of the bull's eye | Locked group into a specific technology |
| Allowed for easy entry of more pictures (had about 100) | Web site technology constrained interaction options |
| Only one group member had access to the Web account where the prototype was stored because group space on ASP server not requested in time | |
| Code had to be updated at SIMS, and couldn't be uploaded from off campus (limitation of network security set-up) | |
| Two group members had used ASP, but only one group member was extremely experienced with it (luckily, he was an expert) | |
Our second interactive prototype was implemented included some additional technologies. As a response to Heuristic Evaluation, and class feedback the group developed a supplemental grid vew for viewing images. Because there were ASP issues (mostly due to not being able to update the site from off campus) the grid view was developed using PHP and MySQL. This did lead to some problems because we had two separate databases that we had to keep consistent.
| Interactive Prototype II | |
| Pros | Cons |
| Added functionality worked great | Two programming languages on the same project |
| Looked better | Two databases that needed to be synchronized |
| Was well-recieved by the users | Difficult to keep interaction consistent |
| Better balanced the development work | Difficult to keep interface elements consistent |
| Easy to make small changes | The two interfaces needed to talk to each other |
| PHP half could be updated off-campus | Code updates tended to be time consuming |
Our third interactive prototype was implemented with the same technology as the first two with the addition of some elements being demoed in Macromedia Flash. The selection of Flash as a demo platform was due to the lack of animation capabilities in HTML/ASP/PHP. We also wanted a way to work through some more proof-of-concept ideas without having to do a lot of additional coding. View Flash demo
| Interactive Prototype III | |
| Pros | Cons |
| Prototyping can be done more rapidly | A third development technology |
| Will not be connected to our database | |
Next: Design Evolution