|
Assignment #5
Revised Interface Design
Prototype Overview
Representative Scenarios
Appendix
Revised
Interface Design
Differences from Low-Fi Testing
Building upon the insight gained during Assignment 4, the
areas where we needed to make adjustments fell into two areas:
- Content vs. Presentation: Initially, we envisioned
using the academic interests users select during the set-up process
to recommend conent for their homepage. With the exception of
news feeds, subsequent modifications would be made within the
Preferences area. However, during the low-fi testing process users
did not grasp the connection between their academic interests
and available content items. Nor did they intuitively navigate
to the Preferences area to modify their set-up.
During interviews users did express interest in receiving
recommendations for content based on their academic interests,
therefore we
decided
to keep this aspect of the set-up process. We chose to modify
our design to clarify the linkage. Specifically in our low-fi
prototype users
selected interests and then subsequently reviewed available
content channels during the set-up process. In the interactive
prototype, we modified the design so that relevant channels
are brought into view when a user selects an academic interest.
Users were also confused about the location of functionality
for modifying content and presentation. Many testers said their
expectations came from existing models like myYahoo!. These
portals tend to use the term "Preferences" to designate
the area where content and layout changes are made. To leverage
any prior learning users may have from interacting with such
sites, we decided to utilize this metaphor in our design. We
improved the navigational aspects of the Preferences area by
creating more intuitive submenus for Content and Color Scheme.
Lastly, since users expected to be able to return to the initial
set-up screen, we added an option in the Preferences area called
profile.
- Terminology: Our low-fi prototype used the
term "channel" to designate an area of content. Even
though most users grasped the meaning after interacting with the
prototype, the majority were initially thrown-off by the word.
They were unsure what it was referring to or how the selection
of a "content channel" during set-up would impact subsequent
screens in the application. The interactive prototype sought to
address this issue. We also added an explanation of channels to
the initial welcome to reinforce the "channel" metaphor.
In addition, separating content from presentation in the Preferences
area helped clarify what a channel was and how it could be used.
Another point of confusion in the Preferences area stemmed
from the verbs we included in front of each menu option. For
example even though users could add or remove channels from
the Edit Channel Layout option, the interpretation was that
it only allowed for adding channels - not removal. To correct
this issue we used a suggestion made by a tester - removing
the verbs when multiple functions can be performed within an
option. Edit Channel Layout became Content, Edit Color Scheme
became Color Scheme, Edit User Profile became Profile, and View
MySIMS Settings became Account Administration.
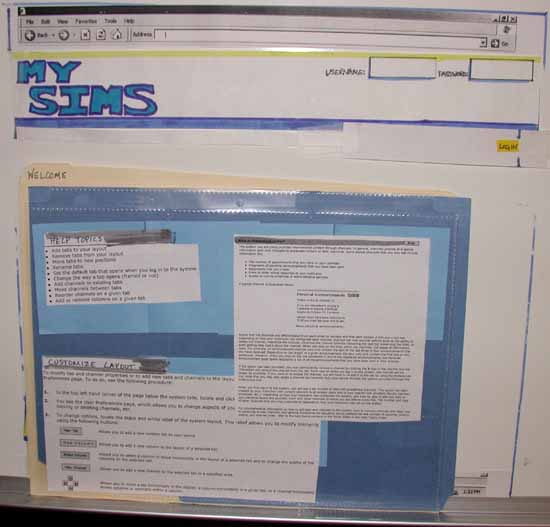
Changes to Interactive Prototype
As part of the development process for our interactive prototype
we developed wireframes. One outlines the
basic tab structure in the MySIMS portal. The other
shows the Preferences
area. An expert
guide was also developed to explain the intended functionality
in the Preferences area. Based on feedback gathered while developing
the interactive prototype with other individuals, certain aspects
outlined in the wireframes were revised, specifically in the
Preferences
area as mentioned above.
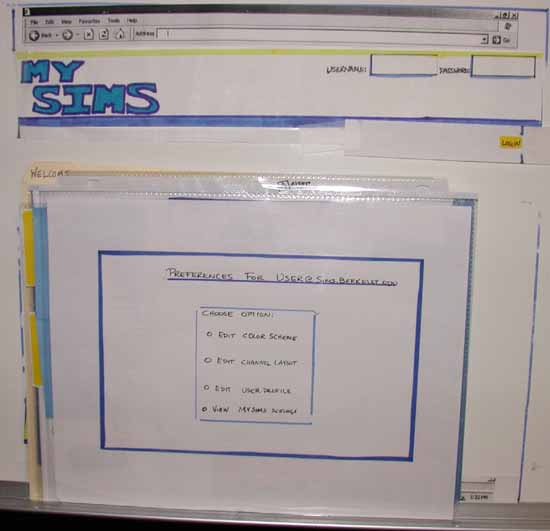
In the Preferences area, a secondary - section specific - navigation
menu was added. The four options within the Preferences navigation
are: Content, Color Scheme, Profile, and Account Administration.
The available options satisfy testers requests for the separation
of content and presentation. Content can be manipulated after selecting
the Content link. Users can update their Color Scheme by selecting
the Color Scheme link. Users wanted to be able to review the items
they selected during the Setup process therefore we added a Profile
link that gave them the ability to do so. Since many testers envisioned
MySIMS replacing the current iteration of My.SIMS, an Account Administration
link was also added. Clicking this link would allow users to see
the administrative details currently found under My.SIMS - pages
printed, storage limits, etc.
Prototype
Overview
Overview of the UI
The main aspects of the user interface fall into the following
categories:.
- Setup: We envision our prototype to take the
place of the current SIMS
or Cardea site. Students would be presented with the MySIMS
portal instead of the current UIs. In the upper right-hand
corner, areas for entering User Name and Password details are
provided. Until the user logons, default (not personalized) content
would be presented in each tab.
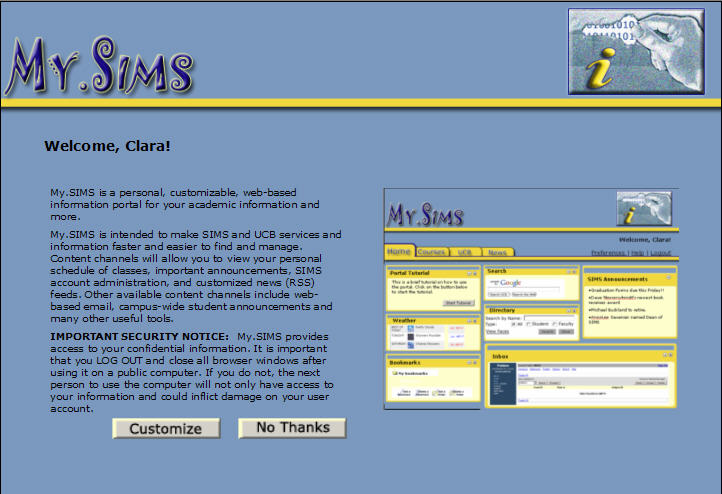
- Welcome Page: The first time users logon to
MySIMS, they will be presented with a Welcome
Page. It explains MySIMS as well as introduces terminology
- such as content channels. To set the context for their interaction
with the portal, the Welcome
Page
also
includes a screen shot of the MySIMS portal. Users
can choose to customize their instance of MySIMS by selecting
the "Customize" button at the bottom of the screen.
Students who want to use the default instance of MySIMS can select
a button labeled "No Thanks". Also security notice
highlights the importance of logging off.
- Student Interests Page:
The information provided on the Student
Interests page is used
to
personalize
the contents of the Home, Courses, and News tabs. The page contains
three sections. The Personal Information section allows students
to review their name and email
address. These details are pre-populated due to MySIMS integration
with SIMS administrative system. They can also
provide an instant
messenger
ID, picture, phone number, and URL. In the Course Details section
students courses are listed. They are populated from SIMS course
registration system. Students can add courses they are interested
in as well. This functionality allows students who are auditing
or simply interested in a course to monitor it on their MySIMS
portal. The Academic Interests section gives students the ability
to check off interests and select related content channels. If
students select some channels, an Interests tab will be added
to their instance of MySIMS. Students who do not choose to customize
MySIMS or do not indicate any channels in the Academic Interests
section will not have an Interests tab. Save
and
Cancel
buttons
are
provided
to allow
students
to Save their
entries
or exit the MySIMS set-up process.
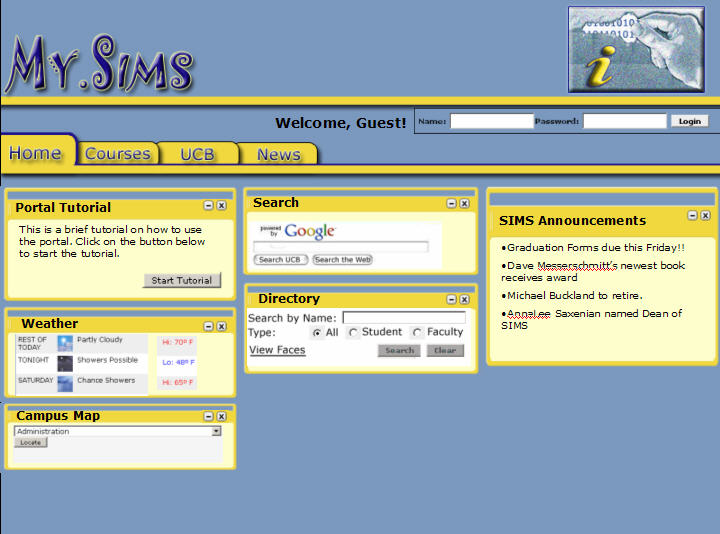
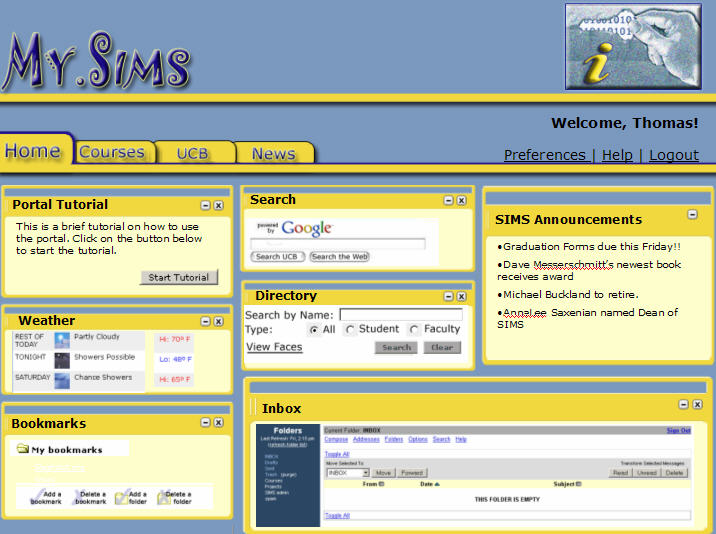
- MySIMS Portal - Tabs, Content Channels, and QuickLinks:
For each student, the initial
MySIMS set-up contains some common navigational elements. They
are the MySIMS logo, login area, four tabs,
and a series of "QuickLinks".
Clicking on the MySIMS logo returns the user to their Home tab.
The login area contains text fields for entering username and
password details. The QuickLinks are hyperlinks which, when clicked,
take the user directly to the following part of MySIMS: Help (goes
to MySIMS help pages), Logout (logs the user out of MySIMS),
and Preferences (presents
options which allow the user to customize their instance
of MySIMS). Initially each student is presented with the Home,
Courses, UCB, and News tabs. Clicking on a tab's label brings
the selected
tab into view.
- Home Tab: Until users add
or remove content, their Home tab contains channels
general interest channels - Portal Tutorial, Weather, Bookmarks,
Search, Directory, SIMS Announcements and Email.
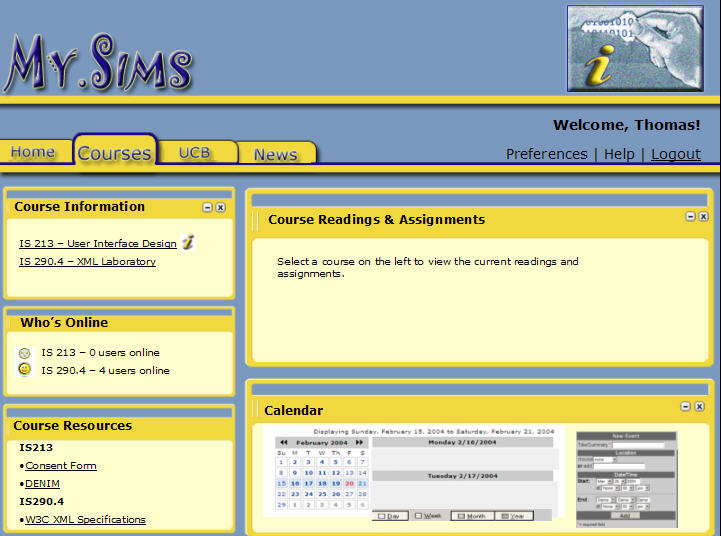
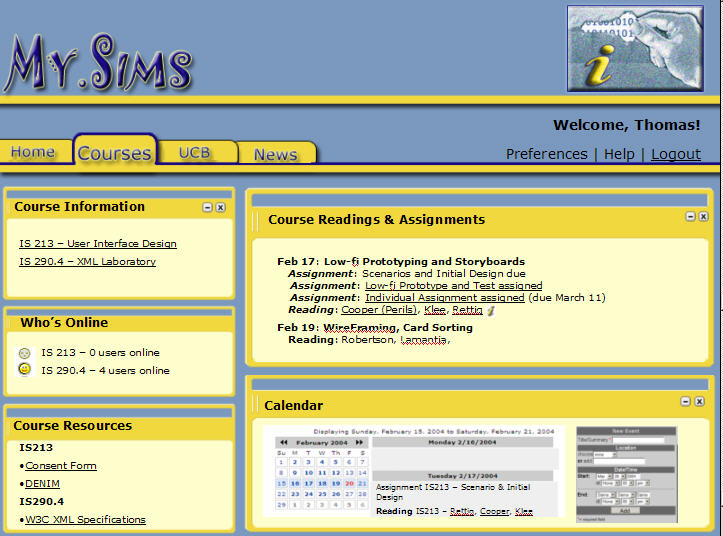
- Courses Tab: The Courses tab contains
a Course Information channel which presents the student's current
course list. Clicking on a course populates the Readings
& Assignments channel. The Course Resources channel displays
links to supplementary resources. A Calendar channel gives students
the ability to view their activities (personal as well as course
related) for a
selected timeframe (day, week, month, and year).
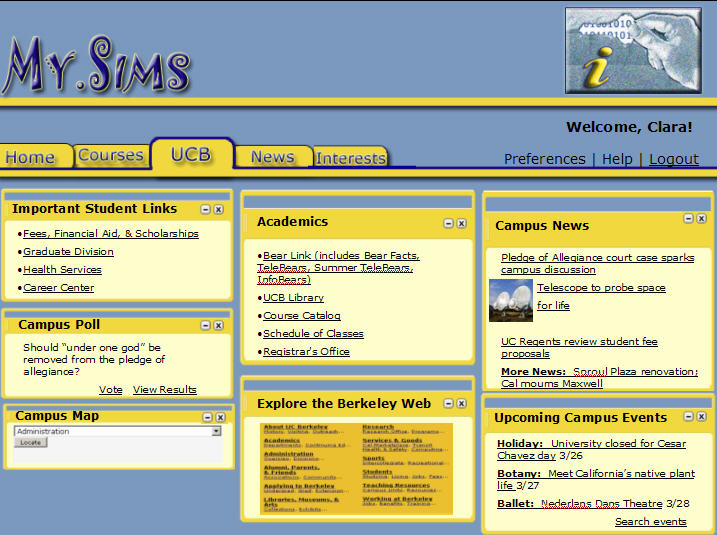
- UCB Tab: Because all students are impacted
by UC-wide mandates, the UCB
Tab includes content channels focusing on campus-wide news,
events, and information. For example content channels focusing
on Important Student Links, Campus Polls, Campus Map, Academics,
Explore Berkeley Web, Campus News, and Upcoming Campus Events
are included on the UCB Tab.
- News Tab: Until they make changes within
the Preferences area, the content channels on the News
Tab are
determined by
the selections the student made within the Student
Interests Page. The default channels are News Sources, News
Sources Headlines, Comic of the Day, News Reader, and Search.
The student can use the News Sources channel to select and view
specific news source. In a
similar manner, clicking on one of the stories in the New Sources
Headlines channel causes the story to
be presented in the News Reader channel. From here the student
can use the Email Story link to email the story. Also
Add Feed and Remove Feed links on the
News
Sources channel give
students the ability to add specific feeds to the News
Stories drop down.
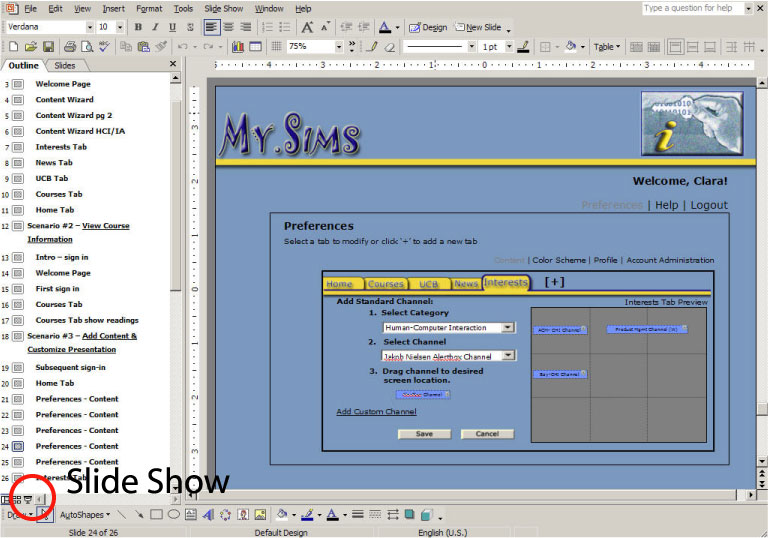
- Preferences: After clicking on the Preferences
QuickLink, the student is presented with a the Preferences page.
It includes four secondary navigation links - Content, Color
Scheme, Profile, and Account Administration.
From the Content link students can click on a tab. Doing so,
causes an "interactive" preview
to be presented as well drop down menus labeled Select Category
and Select Channel. The contents in the Select Channel drop down
are based on the item the student chose in the Select Category
drop down. After selecting a channel, an image representing the
content channel appears.
The student is directed to add it to their desired location on the
preview. An Add Custom Channel link is included and allows students
to incorporate channels beyond on the standard ones provided
by SIMS. After updating the tab, the student can select the Save
button. Students
can
exit
out
of
the process
by clicking
the
Cancel button.
Initial Sketches
Initial sketches of the scenarios were produced before work
on the interactive prototype was begun.
What Was Left Out This version of the prototype does not include screens for the
following items.
- Student Interests Page: Due to the nature
of PowerPoint, students cannot enter information
into the text fields.
- MySIMS Portal - Tabs, Content Channels, and QuickLinks:
The Quicklinks for Help and Logout have not been built out.
- Home Tab: Interactive aspects of the content
channels have not been built out.
- Courses Tab: Interactive aspects of most
content channels has not been built out. For example the only
calendar view being provided is for the week. We envision the
other options following the Palm model for day, month, and year.
- UCB Tab: Interactive aspects of the content
channels have not been built out.
- News Tab: Even though interactive aspects
of the content channels has not been built out, we envision them
following the model we outlined in our Low-Fi
prototype. For
example the steps to email the story is not provided. Even though
Add
Feed
and
Remove Feed screens are not available, we envision selecting
Add Feed causes
a pop-up to appear. It includes two text boxes (Feed Name, Feed
URL) and an Add button. Entering
the information and clicking Add causes the feed to be added
to the News Stories drop down.
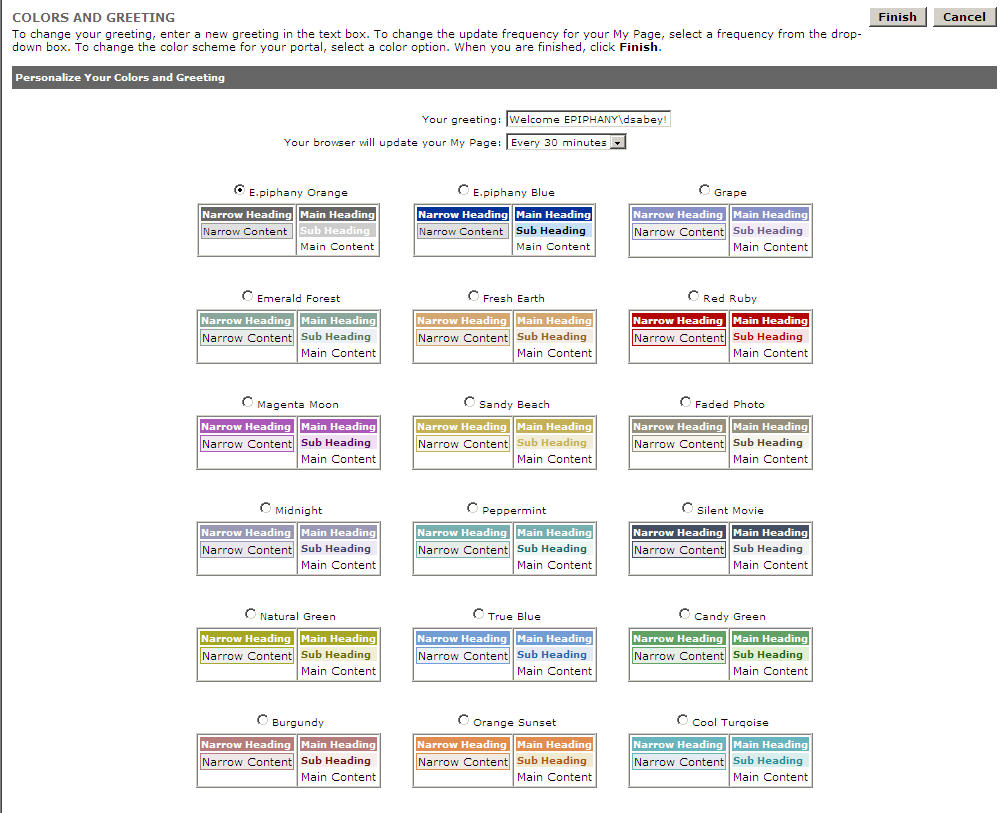
- Preferences: Only the Content and Profile
secondary navigation link have been built. We did not provide
screens showing
what
would happen if the student tried to add a content channel to
a tab that was already "full" and
contained nine content channels. Profile return the student
to their Student
Interests Page. We
envision Color Scheme to follow the structure seen in
the Yahoo or corporate
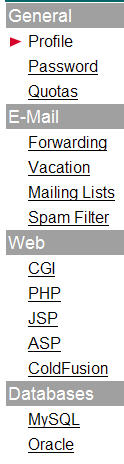
portals. Account Administration would present details
found in the current version of My.SIMS.
Due
to input gathered during Assignment 4, we determined these
aspects listed above to be secondary to the initial design. Also,
we realize, input gathered
during testing of the Interactive Prototype will play a vital
role in determining the design of these features.
Tools We Used
Based on experience gained outside of SIMS, we decided to build
our prototype in PowerPoint. Users realize PowerPoint is not
the final interface. As a result, they tend to be more open with
their
comments and provide more constructive feedback. We felt it was
important to gather as much feedback as possible during this
early stage in the development process. Also using PowerPoint
eliminated any technological constraints, such
as learning curves,
which
would have existed
if the team developed the Interactive Prototype using HTML, Java,
or other applications.
Hyperlinks were added to navigational aspects within the PowerPoint
prototype. These links provided an interactive platform and allowed
us to control end-user navigation through the interface components.
By observing how end users attempt to navigate through the prototype
we will learn if the aspects we have made interactive
match end-user expectations.
The graphics functionality in PowerPoint did not include all the
widgets we needed. Screenshots were modified in Adobe Photoshop
for most of the graphical aspects of the Tabs and content channels.
Microsoft Publisher was used to produce the form elements such as
text boxes and checkboxes.
Running the Interface
After opening the PowerPoint file, it needs to be placed into Slide Show mode.
This mode can be accessed from the Slide
Show image at the bottom of PowerPoint or via the View menu (select Slide
Show). Completing the scenarios outlined below will require clicking on certain
aspects of the prototype. Links were added to the corresponding portions of
the prototype to support the necessary functionality. As the user hovers over
a link, their cursor will change from an arrow to a hand. Then the user can
click on the linked functionality. After doing so, the page to which the link
was associated is presented.
Representative
Scenarios
The tasks and scenarios
outlined in Assignment 3 and Assignment
4 were referenced
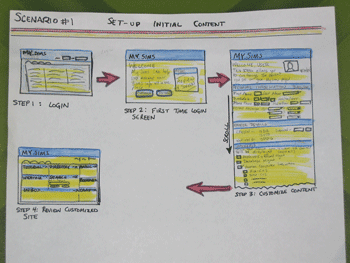
when developing the scenarios for use with the Interactive prototype. Scenario #1 - Setup Initial Content
This is the first time Clara is using MySIMS.
She logs on and agrees to customize her instance of MySIMS. To
ensure her preferences are set correctly, she reviews the existing
demographic details and course information. Then she indicates she is
interested in HCI and Product / Project Management. Upon completion,
she saves her customizations.
Steps:
- Clara logs on to MySIMS using her Name and Password.
- She is presented with a welcome page. The page
includes a screen shot of the portal.
- She reads the screen and selects the "Customize" button
at the bottom of the screen.
- On the Profile page Clara the prepopulated information
- She scrolls (pages) down and selects two Academic
Interests - Human Computer Interaction and Product
/ Project Management
- She decides to subscribe to the ACM-CHI Channel
and Product Dev & Mgmt Association channel.
- After selecting the "Save" button,
Clara is brought into her Interests tab.
- She looks over the contents of the other tabs
(Home, Courses, UCB, and News) and sees
they
are customized according to her selections.
- Clara logs off.
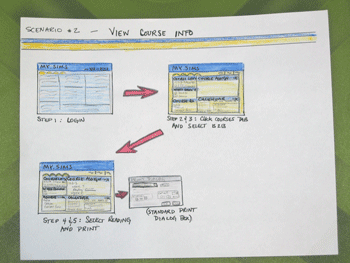
Scenario #2 - View Course Information
Thomas is taking IS213. He forgot to download a reading from February 17th by
Rettig.
This is the first time he has used MySIMS, so he must go through the setup process
first.
Steps:
- Thomas logs on to MySIMS using her Name and Password.
- He is presented with a welcome page. The page includes a screen shot of
the portal.
- After reading the screen, he decides not to customize his instance of MySIMS.
He selects the "No Thanks" button
at the bottom of the screen.
-
Thomas is automatically brought into the Home tab. He reviews the general material.
- Then he clicks on the Courses tab. It is brought to the front. All of
his courses are listed in the Course Information channel.
An "i" icon is presented next to IS213 - User Interface Design. It
indicates updates have been made to course readings and/or assignments
- He selects IS213 - User Interface Design.
- This week's Readings & Assignments are presented.
- He clicks on Rettig.
- The standard download screen is presented.
- Thomas logs off.
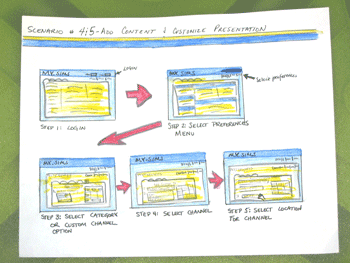
Scenario #3 - Customize Content
A friend told Clara about a cool HCI content channel
by Jakob Nielsen. She decides
to add it to the Interests tab in her MySIMS portal.
Steps:
- Clara logs on to MySIMS using her Name and Password.
- Clara selected the Preferences QuickLink.
- She selects the Content secondary navigation link.
- Clara wants to add the Content Channel to her Interests tab [The Interest
tab is already at the front]
- Due to the nature of the content channel, she selects Human-Computer
Interaction from the Content Category drop-down
- The available content channels are updated. She selects Jakob Nielsen's
Alertbox Channel from the Content Channel drop-down
- Following the instructions for Step 3, she clicks on the content channel
and uses her mouse to drag it to her preferred location on the Interests
tab preview
- She reviews her changes and selects Save
- Clara is brought to the Interests tab where she can now read items from
Jakob Nielsen's Alertbox
Appendix
Class Presentation: SIMSCorpus_Presentation
(ppt - 174KB)
Interaction Flow Diagrams: Basic
Tab Structure, Preferences,
Expert Guide
Interactive Prototype: SIMSCorpus_InteractivePrototype
(ppt - 7MB)
Note: A link to the Interactive Prototype is
being included instead of screen shots.
|

