Part 1
Description
I simply followed the instruction, and use the same code provided by the course website to create the crawler in this first part of homework.
Component
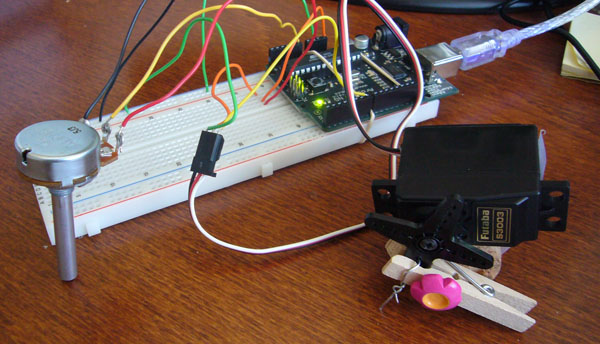
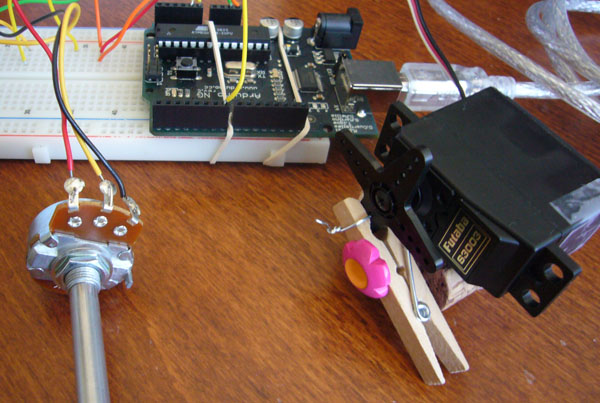
1. Arduino board
2. White board
3. Wires (connect pot and servo motor to the Arduino board)
4. Servo motor(connect to pin7)
5. Potentiometer(connect to pin0)
6. Arduino environment
7. Wooden Clip
8. Cork
Code
I download this code from the course website.
/*
* Servo with Potentiometer control
* Theory and Practice of Tangible User Interfaces
* October 11 2007
*/
int servoPin = 7; // Control pin for servo motor
int potPin = 0; // select the input pin for the potentiometer
int pulseWidth = 0; // Amount to pulse the servo
long lastPulse = 0; // the time in millisecs of the last pulse
int refreshTime = 20; // the time in millisecs needed in between pulses
int val; // variable used to store data from potentiometer
int minPulse = 500; // minimum pulse width
void setup() {
pinMode(servoPin, OUTPUT); // Set servo pin as an output pin
pulseWidth = minPulse; // Set the motor position to the minimum
Serial.begin(9600); // connect to the serial port
Serial.println("servo_serial_better ready");
}
void loop() {
val = analogRead(potPin); // read the value from the sensor, between 0 - 1024
if (val > 0 && val <= 999 ) {
pulseWidth = val*2 + minPulse; // convert angle to microseconds
Serial.print("moving servo to ");
Serial.println(pulseWidth,DEC);
}
updateServo(); // update servo position
}
// called every loop().
void updateServo() {
// pulse the servo again if rhe refresh time (20 ms) have passed:
if (millis() - lastPulse >= refreshTime) {
digitalWrite(servoPin, HIGH); // Turn the motor on
delayMicroseconds(pulseWidth); // Length of the pulse sets the motor position
digitalWrite(servoPin, LOW); // Turn the motor off
lastPulse = millis(); // save the time of the last pulse
}
}
Picture
Part 2
Description
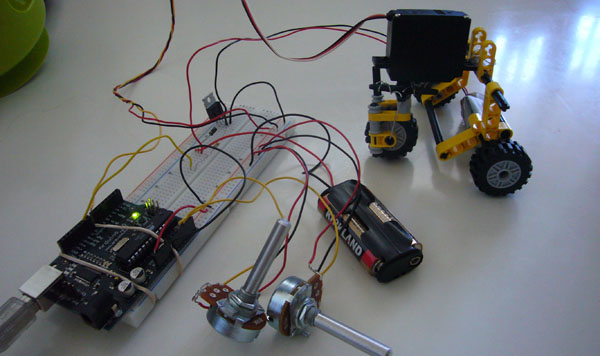
In the second part, I used the components in my Lego Technic package and built a 3-wheel automotive vehicle. The servo motor is connected to the front wheel, such that it is possible to change the direction, and the DC motor is attached to one of the back wheels, so it can turn the wheel and move the car forward.
For the controlling, I attached two potentimeter, one controlling the speed, and the other one controlling the direction, so this vehicle can move like a real car.
Component
1. Arduino board
2. White board
3. Wires (connect pot, DC motor, and servo motor to the Arduino board)
4. 2 Potentiometer
5. Servo motor
6. DC motor
7. 1K Resistor
8. Diode
9. Transistor
10. Arduino environment
11. Lego Technic

Code
/*
* Servo and DC motor controlled by 2 Potentiometer
*/
int servoPin = 7; // Control pin for servo motor
int potPin = 1; // select the input pin for the potentiometer
int pulseWidth = 0; // Amount to pulse the servo
long lastPulse = 0; // the time in millisecs of the last pulse
int refreshTime = 20; // the time in millisecs needed in between pulses
int val; // variable used to store data from potentiometer
int dcmotorPin =9; // contorl pin for DC motor
int pot2pin =3; // select the input pin for second potentionment
int val2 =0; //variable to store the value from pot at pin9
int minPulse = 500; // minimum pulse width
void setup() {
pinMode(servoPin, OUTPUT); // Set servo pin as an output pin
pulseWidth = minPulse; // Set the motor position to the minimum
Serial.begin(9600); // connect to the serial port
Serial.println("servo_serial_better ready");
}
void loop() {
val = analogRead(potPin); // read the value from the sensor, between 0 - 1024
if (val > 0 && val <= 999 ) {
pulseWidth = val*2 + minPulse; // convert angle to microseconds
Serial.print("moving servo to ");
Serial.println(pulseWidth,DEC);
}
updateServo(); // update servo position
val2 = analogRead(pot2pin); // read the value from pot2, pin 3
analogWrite(dcmotorPin, val2/4); // analog write between 0-255 to pin 9
}
// called every loop().
void updateServo() {
// pulse the servo again if rhe refresh time (20 ms) have passed:
if (millis() - lastPulse >= refreshTime) {
digitalWrite(servoPin, HIGH); // Turn the motor on
delayMicroseconds(pulseWidth); // Length of the pulse sets the motor position
digitalWrite(servoPin, LOW); // Turn the motor off
lastPulse = millis(); // save the time of the last pulse
}
}
Picture