Project Members:
Jonathan Breitbart
Seung Wook Kim
Sooyeon Han
Wesley Willett
Description
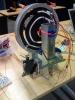
For this lab, we created an instrument out of a small bicycle wheel. We originally used potentiometer to control a dc motor that turned the wheel. But the wheel was not powerful enough and the wheel turned too slowly. So we manually turn the wheel instead. Sound is created in a couple different ways. Two photocell sensors are rigged to the wheel aparatus. A screen with sections cut out lines up with the photosensors. A light shining on the other side of the screen activates the photcell sensors at different intervals depending on the speed of the wheel. Input from one of the photocell sensors activates a piezo speaker. The pitch of the speaker can be varied by turning potentioemeters. The input from the second photocell sensor activates a sound sample on the computer. We used a banjo sample. A physical source of sound comes from three different materials attached to a servo motor. As the wheel turns, items attached to the edge of the wheel strike the the materials attached to the servo motor to make different sounds as the servo turns.
Materials
Small bicycle wheel, metal posts, erector set pieces, dc motor, servo motor, photocell sensors, potentiometers, Arduino boards, wooden stick, metal rods, piezo speakers
Photocell/Piezo Speaker Arduino Code
int cellPin0 = 0;
int cellPin2 = 2;
int potPin = 4;
int speakerPin0 = 7;
int speakerPin2 = 13;
int val0 = 0;
int val2 = 0;
int val4 = 0;
void setup() {
pinMode(speakerPin0, OUTPUT);
Serial.begin(9600);
Serial.println("ready");
}
void loop() {
digitalWrite(speakerPin0, LOW);
digitalWrite(speakerPin2, LOW);
val0 = analogRead(cellPin0);
val2 = analogRead(cellPin2);
val4 = analogRead(potPin);
for (int i=0; i<500; i++) {
if (val0 > 300) {
digitalWrite(speakerPin0, HIGH);
delayMicroseconds(val4);
}
digitalWrite(speakerPin0, LOW);
delayMicroseconds(val4);
if (val2 > 300) {
digitalWrite(speakerPin2, HIGH);
delayMicroseconds(val4*2);
}
digitalWrite(speakerPin2, LOW);
delayMicroseconds(val4*2);
}
Serial.print(val0);
Serial.print("\n");
Serial.print(val2);
Serial.print("\n\n");
}
Photocell/Banjo Sample Processing Code
This code gets serial input from Arduino, based on the input from the photocell.
import krister.Ess.*;
import processing.serial.*;
// Define Audio Channels
AudioChannel banjo;
// Change this to the portname your Arduino board
String portname = "COM4"; // or "COM5"
Serial port;
String buf="";
int threshold = 240;
int cr = 13; // ASCII return == 13
int lf = 10; // ASCII linefeed == 10
int soundplaying = 0; // 0 if sound is playing, 1 if sound is not playing;
void setup() {
// println(Serial.list());
size(200,200);
frameRate(10);
smooth();
background(40,40,40);
noStroke();
port = new Serial(this, portname, 9600);
// adding sound
Ess.start(this);
// loading sounds into new audio channel
banjo = new AudioChannel();
banjo.loadSound("banjo2.aiff");
banjo.gain(10);
}
void draw() {
}
// called whenever serial data arrives
void serialEvent(Serial p) {
int c = port.read();
if (c != lf && c != cr) {
buf += char(c);
}
if (c == lf) {
int val = int(buf);
//println("val="+val);
if (soundplaying == 0){
if (val > threshold){
println("play");
playsound();
}
}
buf = "";
// background(40,40,40); // erase screen
}
}
void playsound(){
soundplaying = 1;
println("play");
banjo.play();
}
void audioChannelDone(AudioChannel ch) {
soundplaying = 0;
// println("AudioChannel "+ch+" is done playing.");
}
Pictures

Videos
http://tels.berkeley.edu/~breity/P1010003.MOV
http://tels.berkeley.edu/~breity/P1010004.MOV
http://tels.berkeley.edu/~breity/P1010005.MOV
