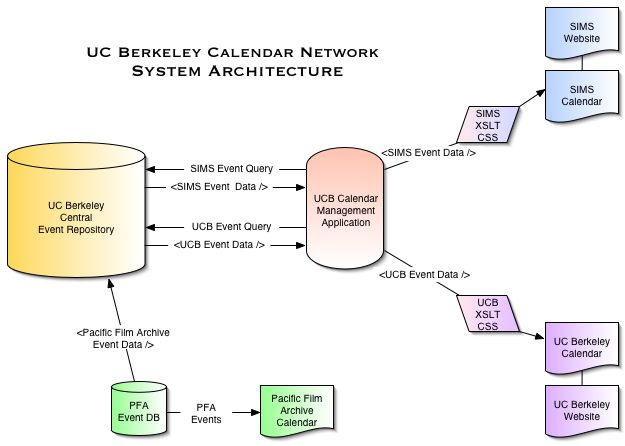
The architecture of our system is centered around a U.C. Berkeley Central Event Repository. This relational database will contain tables that map to our Event model. All calendars using the U.C. Berkeley Calendar Network will store their Event data in this repository. This will enable all calendars in the network to access their Event data if they have chosen to share it by marking their Events "public." Calendars who prefer not use the Central Event Repository to store data, but would still like to share their Event information or receive Event information from the repository, can communicate with it via an XML document. The schema for this Events.xml document can be found in Appendix A. It will be necessary to either use an XML-aware database such as Oracle 9i or build a parser that can translate these XML documents into relational database fields and vice versa for this type of communication to occur.
The UCB Calendar Management Application can be used to manage Event information within the repository, create a web-based calendar, or both. Some calendars will choose not to use our system to create their calendar because they have requirements for their website that cannot we will not be able to address in the early versions. However, they can still use the Event Management section of the Calendar Management Application to send data to all calendars using the Central Event Repository as well as manage any data they choose to send there.
Calendar Administrators may also decide to create their web-based calendar using our system. Our Calendar Management Tool provides a highly-designed, dynamic web-based calendar which can provide many different views of the same Event data. These views are created by applying XSL transforms & Cascading Style Sheets to Events.xml documents. Users can choose to use this default calendar, or use the Calendar Management Tool to modify our default calendar to reproduce the "look and feel" of their website within their calendar. Screen shots of this calendar can be found in Appendix K.
Calendars created with the Calendar Management Tool will be hosted on a central server which connects to the Central Event Repository using a physical three tier architecture. Thus, these calendars will have a URL that reflects the central server's name. Calendars wishing to display their own URL instead of that of the central server can use a URL alias. When a website visitor chooses a calendar view, a query with the type of information they would like to see (e.g. All events in January for the Letters & Science calendar) will be sent to the Central Repository. The data will be parsed into an XML document and transformed using an XSL stylesheet to provide the user with the requested display. Caching will be used to make the display of each calendar as efficient as possible.
The Event Manager comprises the main set of functionality in the U.C. Berkeley Calendar Network Tool. It provides all of the functionality needed to manage events. This includes:
Creating, editing or deleting events
Posting or removing events from the calendar
Searching for events on other calendars within the network
Setting up subscriptions for particular types of events from other calendars within the network
Exporting event data out of the system
Calendar Events is the main page of the Event Manager and is the first page displayed after login. It contains all of the event data for the account. The event data is separated into three different sections: pending events, posted events and archived events. Each section is displayed as a separate tab within the body of the page.
The Pending events tab displays a list of events that are not yet posted to the calendar. These events can come from five different sources:
Draft: An event created by the account owner that was saved as a draft. This is done via the Create Event form described in section 6.2.1.2.
Subscription: An event matching the search criteria in a subscription that specifies "manual approval". See section 6.2.1.4 for further explanation.
Recommendation: An event that was recommended by another account owner within the network. See section 6.2.1.6.1 for further explanation.
Search: An event found via "Search Campus Events" that was saved as pending. See section 6.2.1.3 for further explanation.
External Add form: An event entered via an external add form that is open to the public or a designated audience via the Internet.
There are five data fields displayed for each pending event. These include:
Event Date & Time - The date and time when the event is occurring.
Title - The title of the event.
Sponsor - The account that created the event.
Source - One of the five options described above.
Received - The date on which the event was received into the pending list.
The Posted events tab displays a list of events that are currently posted to the live calendar. There are four data fields displayed for each posted event. These include:
Event Date & Time - The date and time when the event is occurring.
Title - The title of the event.
Sponsor - The account that created the event.
Source - One of the five options described above.

The Archived events tab displays a list of events for which the event date has passed the live calendar display threshold (see section 6.2.2.1 General Appearance: Calendar Display Range). At that point, the event automatically moves from the posted tab to the archived tab. There are four data fields displayed for each archived event. These include:
Event Date & Time - The date and time when the event is occurring.
Title - The title of the event.
Sponsor - The account that created the event.
Source - One of the five options described above.
The following actions are available within the Calendar Events tabs. Each action is available in any of the three tabs unless otherwise noted.
Sort - The default sort for each tab is by Event date and time. Clicking on the column title for any of the available data fields will resort the events within that tab by the chosen data field.
Simple Search- The default search is a simple keyword search of the event title or description. Other choices available via a drop-down menu are search by sponsor, event type, participant, location or event date. Once the criterion has been specified, clicking the search button will search for matching events within the current tab only and replace that event list with the search results. Choosing the clear search button will return the full list of events.
Advanced Search - Clicking the advanced search link expands the search area to allow multiple criteria to be selected together creating a narrower search.
View Event Details - Clicking on an event title will display the Event Details page for that event. See section 6.2.1.6 for more information.
Multiple Item Post (Pending tab only) - The post button on this tab acts upon the events selected via the check boxes in the left most column. Clicking this button will display a confirmation page listing the selected events with options to continue or cancel. When continue is chosen, the selected events will be posted to the live calendar and the events move from the pending tab to the posted tab.
Multiple item Delete (Pending & Archived tabs only) - The delete button acts upon the events selected via the check boxes in the left most column. Clicking this button will display a confirmation page listing the selected events with options to continue or cancel. The selected events will be deleted from the network (if owned by the account) or removed from the account (if not owned).
Edit (Pending & Posted tabs only) - Events that are owned by the account will have an edit button on the right side of the title column. Clicking this button displays the create event form prepopulated with the data for the chosen event allowing the data to be edited.
This page is a form for entering a new event into the system. The available data fields are based on the event model. There are two required fields: event sharing status and event title. Event sharing status is a choice between 'public' or 'private'. Choosing 'public' makes the event available to other calendars in the network once it has been posted on the owner's calendar. Choosing 'private' means the event will only be displayed on the owner's calendar and the event will not be available to other calendars in the network.
There are four buttons in the Create Event form:
Save and Post - Choosing this option displays the entered data on a confirmation page for review with the option to continue or go back to the form. Choosing continue posts the event to the calendar immediately. A date must be entered in order to complete this option. If the event is 'public' it will be available to other calendars in the network.
Save as Draft - Choosing this option displays the entered data on a confirmation page for review with the option to continue or go back to the form. Choosing continue saves the event in the pending list. The event is considered in a draft stage so even if it is marked as 'public', it will not be available to the calendar network until it has been posted.
Preview - Choosing this option opens a separate window to display a preview of the event as it would be displayed on the live calendar. The only action available in this window will be a button to close it. The event will not be saved unless one of the save buttons is clicked.
Cancel - Choosing this option returns the user to the Calendar Events page and all data entered is discarded.
One of the benefits of the calendar network is that one calendar can easily post an event from another calendar without anyone having to manually re-enter or maintain the data. This also prevents duplication of data because an event is entered once and can be displayed on multiple calendars. This page provides the functionality to search the network's repository of public events. Only events that have been designated as 'public' will be searchable. The search mechanism is the same as the search mechanism used on the tabs in the Calendar Events page (see section 6.2.1.1.4).
After choosing a set of search criteria and clicking the search button, the results are displayed in a table below the search section. The data fields displayed for each event in the search results include:
Event Date & Time - The date and time when the event is occurring.
Title - The title of the event.
Sponsor - The account that create the event.
Live on your calendar? - A yes/no field indicating whether the event is already posted on the account's calendar.
The following actions are available after receiving search results:
Sort - The default sort for the search results is by Event date and time. Clicking on the column title for any of the available data fields will resort the search results by the chosen data field.
View Event Details - Clicking on an event title will display the Event Details page for that event. See section 6.2.1.6 for more information.
Multiple Item Post - The post button in the search results table acts upon the events selected via the check boxes in the left most column. The selected events will be posted to the live calendar and the events will be listed on the posted tab of the Calendar Events page.
Save Search as Subscription- This option allows the chosen search criteria to be saved as a subscription. It opens the subscription page and prepopulates the search criteria in step one of the "create a subscription" form. See section 6.2.1.4 for more information.

The purpose of this page is to allow account owners to set up subscriptions for specific kinds of events. A subscription is a saved set of search criteria (e.g. seminars sponsored by the Biology department that contain the keyword 'environment' in the description). Each time a public event matching the search criteria of the subscription is entered into the calendar network, the event will be added to the subscribed account.
The lower section of the Subscribe page contains the form used to create a new subscription. The process consists of three steps:
Step 1: Choose One or More Search Criteria - The available search criteria include keyword, sponsor, event type, participant and location.
Step 2: Select Options - The three subscription options include:
Approval - This option is required. The available choices are 'manual' or 'automatic'. 'Manual' indicates that when events matching the search criteria of the subscription are found, they will be listed in the account's list of pending events. 'Automatic' means that when matching events are found, they will automatically be posted to the account's calendar and will be listed in the account's list of posted events.
Time Period - This is a required field which adds a time constraint to the subscription. It is an indication of how far into the future a matching event will be added to the account. For example if the selected time period is 'one month' then the subscription searches for events matching the search criteria that occur within one month of the present date.
Expiration Date - This is an optional field representing the date after which the subscription will no longer be valid and will cease searching for matching events.
Step 3: Name Your Subscription - A text field to allow the user to provide a name for the subscription which will be displayed in the Current Subscriptions list.
There are four available buttons to act upon the form:
Subscribe - Clicking this button saves and activates the subscription. The subscription will be listed in the Current Subscriptions table.
Preview Results - Clicking this button will run a search using the chosen criteria on the current set of events in the network. The results will be displayed in a separate window. The only actions available within this window are to view the details of an event by clicking on the event title or closing the preview window.
Clear - Clicking this button clears the data from the form.
Cancel - Clicking this button returns the user to the Calendar Events page and discards any data entered into the form.
This first section of the Subscribe page contains a table listing each of the subscriptions belonging to the account. The following data fields are listed for each subscription:
Title - The title given to the subscription.
Approval - Manual or Automatic. See Step 2 above for a more detailed description.
Time Period - The time constraint on the subscription. See Step 2 above for a more detailed description.
Expiration Date - Optional expiration date for the subscription. See Step 2 above for a more detailed description.
The following functionality is provided to manage the current subscriptions:
Edit - Each subscription listed in the table will have an Edit button to the right of the title. Clicking on this button changes the bottom section of the page from "Create a New Subscription" to "Edit Subscription" and prepopulates the form with the data from the chosen subscription allowing it to be edited.
Delete - The delete button acts upon the subscriptions selected via the check boxes in the left most column. The selected subscriptions will be deleted from account.
This page provides functionality to export event data out of the account using the chosen file format. The page contains a form with three steps:
Step 1: Choose Data Set(s) to Export - This step allows the user to select which data sets to include in the export by checking the selection box next to the corresponding data set. The choices are: pending events, posted events and archived events. More than one data set may be chosen.
Step 2: To Filter Above Data Set(s), Choose one or more search criteria (otherwise skip to step 3) - This step is optional and allows the data sets to be filtered based on any combination of filter criteria. If no criteria are chosen, the entire selected data sets will be exported. The available criteria are keyword in title or description, sponsor, event type, participant, location and event date.
Step 3: Select Export file type - This step allows the user to choose the file format of the exported data set.
There are three available buttons to act upon the form:
Export - Clicking this button opens a standard 'Save File As' dialog box to allow the user to name the exported file and select the location to save it to.
Clear - Clicking this button clears the data from the form.
Cancel- Clicking this button returns the user to the Calendar Events page and discards any data entered into the form.
The event details page is displayed when the title of an event is clicked on. This functionality is available in several places throughout the application wherever an event is listed with a hyperlinked title (e.g. pending events, posted events, archived events, search results). The event data is displayed for review. If the event is owned, all of the event data will be displayed. If the event is not owned, only the 'public' data that is displayed in the calendar will be displayed.
From the event details page, some combination of the following actions are available:
Back to... - A link at the top of the event details page that takes the user back to the page they came from.
Edit - If the event is owned by the account, the event details page will contain an edit button which displays the create event form prepopulated with the data for the chosen event allowing it to be edited.
Post - If the event has not been posted to the account's calendar, the post button will be available. Clicking this button will post the event to the live calendar and the event will be listed on the posted tab of the Calendar Events page.
Remove/ Delete - If the event is currently in the pending list or posted to the calendar the option to remove/delete the event will be available. If the event is owned by the account, the option is 'delete' and choosing it will cause the event to be deleted from the account and the calendar network event repository. If the event is not owned by the account, the option is 'remove' and choosing it will cause the event to be deleted from the account only.
Recommend - A non-owned event or an owned and posted event can be recommended to other calendars within the network. Clicking this button causes the event details page to expand and display a list of network calendars that have agreed to receive recommendations. The user selects the calendars to receive the event and clicks the Recommend button. The event will then appear in the pending list of the account(s) receiving the recommendation.
The Format Calendar page allows calendar administrators to customize their calendar's 'look-and-feel' by modifying the settings in each of its five sections: General Appearance, Headers, Global Navigation, Calendar Navigation, Event Detail and Footer. These sections are displayed as separate tabs within the body of the page. The application then generates calendar views with a XSL transform and CSS file stored within the system. For more advanced users who want to have greater control over the appearance of their calendar, beyond the customization settings of the application, they can choose to replace the default XSL transform and CSS files with their own in the Advanced Settings Tab. There are currently two examples of custom calendar views using XSL transform and CSS: 'horznav_list_month_transform.xsl' and 'horznav_grid_month_transform.xsl'.
Above the tabbed sections is an abstracted preview of what the calendar looks like. It is abstracted because it only shows the current settings for font style and color. It also does not show the actual calendar event content, instead it shows labels in place of actual data. For example the label "Header Text" is placed in the header instead of the actual text displayed on the calendar. In addition, there are pink name tags labeling each section or aspect of the calendar that is customizable. These name tags correspond to the name of the settings in the five tabs to let users know what their settings will affect. Once users change the settings in the tabbed sections, the abstracted preview will update dynamically to display the current settings.
At anytime, users can click the "Save All Changes" and "Preview Your Calendar" buttons that appear at the top and bottom of the page. The "Save All Changes" button will save user changes from all the tabbed sections. Once changes are saved, they will appear in the live calendar. The "Preview Your Calendar" button will open up a new window to display the calendar with the current settings applied to it. This is only a temporary preview and does not reflect the appearance of the live calendar. If users do not save their changes even after previewing their calendar, they will lose the changes when they leave the Format Calendar page.

The General Appearance tab affects the style for the entire calendar. It includes settings for:
Calendar Background Color - Users can set the color in two ways. They can click on the colored square next to the label to bring up a color picker or input the hex value of the color into the text field.
Calendar Display Range - Users need to specify the range of dates available to view on the live calendar. For example, if it is currently the month of May and users choose to 'show calendar 1 month before and 1 month ahead of the current month' then the calendar will display all the events in April, May and June. This is the "live calendar display threshold" which determines when an event is considered archived. See section 6.2.1.1.3.
The Headers tab controls the settings for the header of the calendar. The Header is located at the top of each page and usually displays the department or organization name. The settings within the tab are:
Header - Users can choose to change the Header in three ways. They can enter the text for the header and select the font styles and color for the text. They can upload a graphic header in place of just text. The graphic will appear in the center of the page and assume the general background color. For the most flexibility, they can add their own HTML in the text area provided within the application. However, their HTML will replace any other Header settings.
Date Header - The Date Header appears below the Global Navigation and Calendar Navigation. It displays today's date on the left side and the displayed event date range on the right side. The date range will change depending on users' selection in the Calendar Navigation. For example, if users select to view the events by Month in the Calendar Navigation, then all the events displayed on the page will be for a 1 month range. Users can still navigate month-by-month by clicking on the direction arrows '>>' in the Date Header. Users can set the font style, link style, and colors of the Date Header.
Date Subheader - There is a Date Subheader for each day in the calendar that has at least one event. The date is a link and when clicked will take users to the day list view for that specific day. Users can set the font style, link style, and colors of the Date Subheader.
The Global Navigation appears directly below the Header. The purpose of this section is to help integrate the calendar more fully into the user's site by including navigation to the other pages of the site. This section will only be available if at least one link is included or the user has added HTML to the section. The settings for the tab are:
Layout for Global Navigation - Users can choose a horizontal or vertical navigation layout. By default, the abstracted preview shows a horizontal format calendar.
Global Navigation Links - Users can create a global navigation in one of two ways:
Edit Navigation - Users can enter the link names and their corresponding web addresses in the provided text boxes and set the font style, link style and color.
Edit Navigation HTML - Users can enter the HTML for the navigation directly into the text box.
The Calendar Navigation controls the view of the calendar. On the left side users can choose to view the events in day, week, month, or year view and on the right side, users can select grid or list view. Currently, it is not an option to see the grid view in the abstracted preview because all settings in the grid view are either the same as the list view or created by default (see 1.3.7 Default Styles). The available settings in this tab are:
Calendar Navigation Links - Users can set the font style, link style and color.
Event information appears in two areas within the calendar. The Event Listing (see below) appears in the list view of the calendar. If users want to see the full description and all the details of an event, they must click on the event title from the list view. This will link to the full event detail page. The Event Detail tab sets the styles for both of these areas and the settings are:
Event Detail Text - Users can set the font style, size and color for the event description and the event title. Event title will have the same style as the event description except it will be bold and underlined.
Event Detail Links - Users can set the font style and color of any links within the event description. For example in the Create Event form, users can add a sponsor's name and link the name to a web address. In the event details, the event sponsor's name will become a link and assume the style set in this section.
Event Detail Labels - Users can set the font style and color of all event data labels. Labels will not be linked so do not have link styles.
Event Listing - The Event Listing is an abbreviated version of the full event detail page and is visible on the calendar's list view. The Event Listing automatically includes the date and time of the event as well as the event title which links to the event detail page or to a user-specified URL. Users have the option to add Location, Sponsor, and Description Snippet (shortened event description) to the event listing.
The footer refers to the bottom area of the page and functions similarly to the Global Navigation. This section will only be available if at least one link is included or the user has added HTML to the section. The settings for the tab are:
Edit Footer - Users can create a footer in one of two ways:
Edit Footer - Users can enter the link names and their corresponding web addresses in the provided text boxes and set the font style, link style and color.
Edit Footer HTML - Users can enter the HTML for the navigation directly into the text box.
For more advanced customization that is not available via the provided tabbed sections, users can use the Advanced Formatting section. Here users can replace the default XSL Transformation file and CSS file with their own.
Download - Users can download the application's default .xsl and .css files by clicking on the download button in the 'Edit Calendar XSL Transformation File' and 'Edit Calendar CSS File' sections. This will invoke a standard 'Save File As' dialog where users can specify a local location to save the files. Users can then view and edit their local copy to fit their needs.
Browse and Replace - When users are ready to replace the current .xsl and .css files, they can click the browse button. This will invoke a standard 'Browse for File' dialog where users can choose the file to upload. Once they click 'OK' the file name and path will appear in the text box next to the browse button. Users can then click replace to upload the new file. There is currently no way for users to return to the application's default .xsl and .css once they have replaced them. So, it is strongly suggested that users save and keep a version of the original files before changing them.
There are many styles in our application's default.css file that are not editable with the Format Calendar interface. For example, all the formatting in the calendar's grid view and grid thumbnail is set by other list view settings or by default. The purpose of the Format Calendar page is to give users enough formatting capabilities without overwhelming them with too many options. For a detailed mapping of the CSS styles to the calendar, see 'style.xls'. See Appendix J.