Description
Based on the textbook, Physical Computing, and experience of last week’s assignment, it didn’t take long to build the basis of this RGB LED device (don’t know exact time I finish it, 5 minutes maybe…) by simply connecting the resistors, LEDs, and Adruino board together with colored wires. However, it was hard to keep everything neat since I don’t want to cut any of these wires or resistors. But the interesting thing here actually is to play with color brightness, and different materials of homemade diffusers(see pictures).
Component
1.Arduino board
2.White breadboard
3.Three LED (red LED connects to pin9, green LED connects to pin10, and blue LED connects to pin11)
4.Three 220-OHM resistors (labeled as red-red-brown-gold)
5.Wires (black and 3 blue ones connect to ground, and 3 yellow connect LEDs and the resistors to pin 9, 10, 11)
6.2 rubber bands
7.USB cable
8.Arduino environment, and the code from course website
9.Homemade diffusers (sponge, napkin, makeup filter, lid of lotion bottle, blue plastic bottle)
Code
This is the code from course website
/*
* Serial RGB LED
* ---------------
* Serial commands control the brightness of R,G,B LEDs
*
* Command structure is "<colorCode><colorVal>", where "colorCode" is
* one of "r","g",or "b" and "colorVal" is a number 0 to 255.
* E.g. "r0" turns the red LED off.
* "g127" turns the green LED to half brightness
* "b64" turns the blue LED to 1/4 brightness
*
* Created 18 October 2006
* copyleft 2006 Tod E. Kurt <tod@todbot.com
* http://todbot.com/
*/
char serInString[100]; // array that will hold the different bytes of the string. 100=100characters;
// -> you must state how long the array will be else it won't work properly
char colorCode;
int colorVal;
int redPin = 9; // Red LED, connected to digital pin 9
int greenPin = 10; // Green LED, connected to digital pin 10
int bluePin = 11; // Blue LED, connected to digital pin 11
void setup() {
pinMode(redPin, OUTPUT); // sets the pins as output
pinMode(greenPin, OUTPUT);
pinMode(bluePin, OUTPUT);
Serial.begin(9600);
analogWrite(redPin, 127); // set them all to mid brightness
analogWrite(greenPin, 127); // set them all to mid brightness
analogWrite(bluePin, 127); // set them all to mid brightness
Serial.println("enter color command (e.g. 'r43') :");
}
void loop () {
//read the serial port and create a string out of what you read
readSerialString(serInString);
colorCode = serInString[0];
if( colorCode == 'r' || colorCode == 'g' || colorCode == 'b' ) {
colorVal = atoi(serInString+1);
Serial.print("setting color ");
Serial.print(colorCode);
Serial.print(" to ");
Serial.print(colorVal);
Serial.println();
serInString[0] = 0; // indicates we've used this string
if(colorCode == 'r')
analogWrite(redPin, colorVal);
else if(colorCode == 'g')
analogWrite(greenPin, colorVal);
else if(colorCode == 'b')
analogWrite(bluePin, colorVal);
}
delay(100); // wait a bit, for serial data
}
//read a string from the serial and store it in an array
//you must supply the array variable
void readSerialString (char *strArray) {
int i = 0;
if(!Serial.available()) {
return;
}
while (Serial.available()) {
strArray[i] = Serial.read();
i++;
}
}
Picture
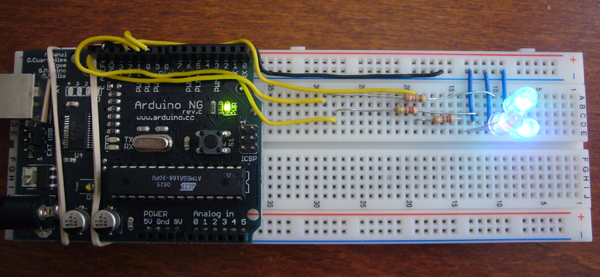
Circuit
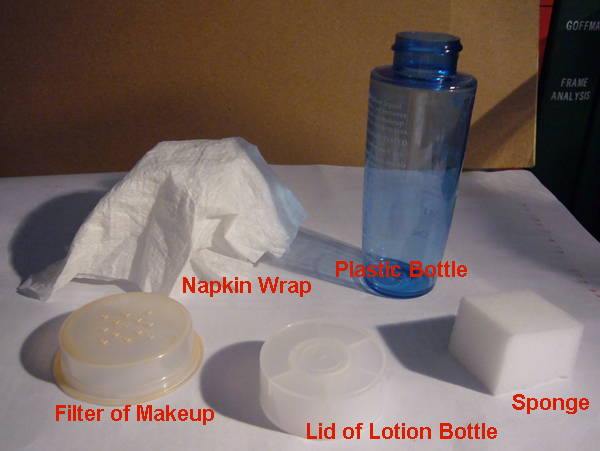
Homemade Diffusers
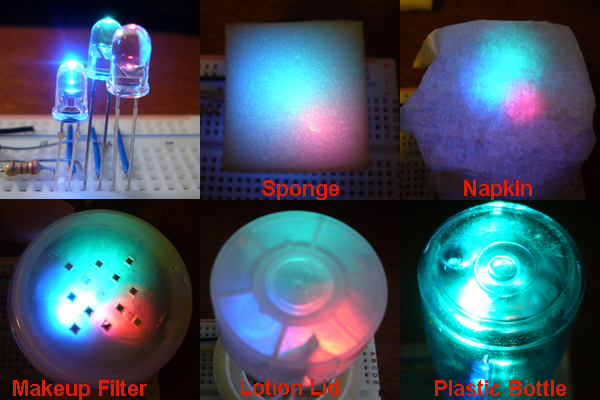
Put Diffusers on LEDs
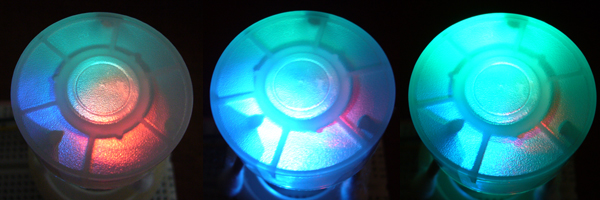
Chane Color Brightness

Comments
GSI Comments
Nice diffusers! (And nice photos of your diffusers!) I like that you tried out a bunch of different items. Each one has different affordances and would be good for different types of interfaces... It would be nice to know which you like the best and why. :)