Assignment: Sensing: Potentiometers
Collaborators:
Assignment: Sensing: Potentiometers
Collaborators: eknight
Author: Erin Knight
Description:
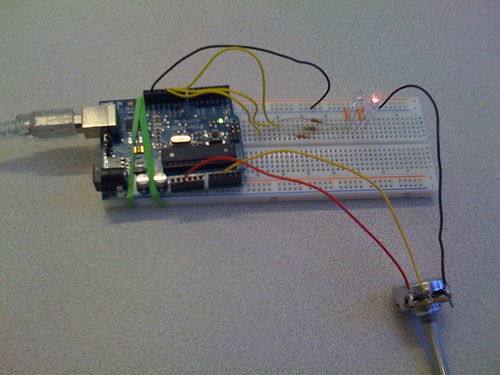
This lab was my first experience with soldering! Heck, it was my first experience with stripping wire! I have to admit, I was pretty darn good at it ;). We soldered three wires to a potentiometer so that we could use the potentiometer to control our LEDs in the following ways:
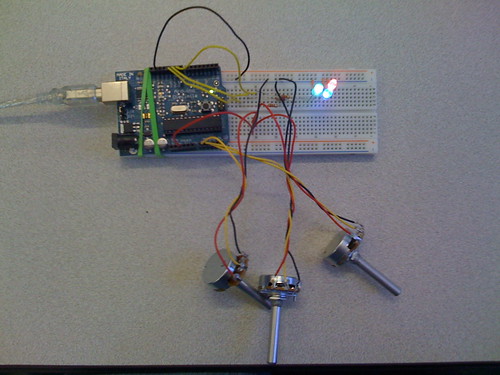
Then I got to strip wires and solder again (woo hoo!) to get set up to use multiple pots to control my LEDs (I did both of the options):
Then I tried my own fun with pots:
I used one pot to create a transition of blinking LEDs - with the rate of the blinking controlled by the pot. So it would blink red, then blue, then green, for example and as I turned the pot, the chasing rainbow would move through the colors more quickly. See code below.
Pictures of my board:
Code:
Using 1 Pot to Control the Brightness of 1 LED:
/*
 * one pot fades one led
 * modified version of AnalogInput
 * by DojoDave <http://www.0j0.org>
 * http://www.arduino.cc/en/Tutorial/AnalogInput
 */
int potPin = 2;   // select the input pin for the potentiometer
int ledPin = 9;   // select the pin for the LED
int val = 0;      // variable to store the value coming from the sensor
void setup() {
  Serial.begin(9600);
}
void loop() {
  val = analogRead(potPin);    // read the value from the sensor, between 0 - 1024
  Serial.println(val);
  analogWrite(ledPin, val/4); // analogWrite can be between 0-255
}
_______________________________________________
Using 1 Pot to Control the Blinking Rate of 1 LED:
/*
 * AnalogInput
 * by DojoDave <http://www.0j0.org>
 *
 * Turns on and off a light emitting diode(LED) connected to digital
 * pin 13. The amount of time the LED will be on and off depends on
 * the value obtained by analogRead(). In the easiest case we connect
 * a potentiometer to analog pin 2.
 *
 * http://www.arduino.cc/en/Tutorial/AnalogInput
 */
int potPin = 2;    // select the input pin for the potentiometer
int ledPin = 13;   // select the pin for the LED
int val = 0;       // variable to store the value coming from the sensor
void setup() {
  pinMode(ledPin, OUTPUT);  // declare the ledPin as an OUTPUT
}
void loop() {
  val = analogRead(potPin);    // read the value from the sensor
  digitalWrite(ledPin, HIGH);  // turn the ledPin on
  delay(val);                  // stop the program for some time
  digitalWrite(ledPin, LOW);   // turn the ledPin off
  delay(val);                  // stop the program for some time
}

____________________________________________________
Using 2 Pots to Control Brightness/Blinking of 3 LEDs:
/*
 * one pot dims, the other pot changes the blinking rate
 * modification of the following
 * http://www.arduino.cc/en/Tutorial/AnalogInput
 */
int pot1Pin = 0;   // select the input pin for the potentiometer 1
int pot2Pin = 1;   // select the input pin for the potentiometer 2
int pot1Val = 0;   // variable to store the value coming from pot 1
int pot2Val = 0;   // variable to store the value coming from pot 2
int led1Pin = 9;   // select the pin for the LED 1
int led2Pin = 11;  // select the pin for the LED 2
void setup() {
   pinMode(led1Pin, OUTPUT);  // declare the led1Pin as an OUTPUT
   pinMode(led2Pin, OUTPUT);  // declare the led2Pin as an OUTPUT
}
void loop() {
   pot1Val = analogRead(pot1Pin);   // read the value from pot 1, between 0 - 1024, for dimming
   pot2Val = analogRead(pot2Pin);   // read the value from pot 2, between 0 - 1024, for blinking
   analogWrite(led2Pin, pot1Val/4); // dim LED to value from pot1
   delay(pot2Val);                  // stop the program for some time, meaning, LED is on for this time
   analogWrite(led2Pin, 0);         // dim LED to completely dark (zero)
   delay(pot2Val);                  // stop the program for some time, meaning, LED is OFF for this time
}

____________________________________________________
Using 3 Pots to Control Brightness of 3 LEDs:
// Analog pin settings
int aIn = 0;    // Potentiometers connected to analog pins 0, 1, and 2
int bIn = 1;    //   (Connect power to 5V and ground to analog ground)
int cIn = 2;

// Digital pin settings
int aOut = 9;   // LEDs connected to digital pins 9, 10 and 11
int bOut = 10;  //   (Connect cathodes to digital ground)
int cOut = 11;

// Values
int aVal = 0;   // Variables to store the input from the potentiometers
int bVal = 0;
int cVal = 0;

// Variables for comparing values between loops
int i = 0;            // Loop counter
int wait = (1000);    // Delay between most recent pot adjustment and output

int checkSum     = 0; // Aggregate pot values
int prevCheckSum = 0;
int sens         = 3; // Sensitivity theshold, to prevent small changes in
                      // pot values from triggering false reporting
// FLAGS
int PRINT = 1; // Set to 1 to output values
int DEBUG = 1; // Set to 1 to turn on debugging output

void setup()
{
  pinMode(aOut, OUTPUT);   // sets the digital pins as output
  pinMode(bOut, OUTPUT);
  pinMode(cOut, OUTPUT);
  Serial.begin(9600);     // Open serial communication for reporting
}

void loop()
{
  i += 1; // Count loop

  aVal = analogRead(aIn) / 4;  // read input pins, convert to 0-255 scale
  bVal = analogRead(bIn) / 4;
  cVal = analogRead(cIn) / 4;

  analogWrite(aOut, aVal);    // Send new values to LEDs
  analogWrite(bOut, bVal);
  analogWrite(cOut, cVal);

  if (i % wait == 0)                // If enough time has passed...
  {
    checkSum = aVal+bVal+cVal;      // ...add up the 3 values.
    if ( abs(checkSum - prevCheckSum) > sens )   // If old and new values differ
                                                  // above sensitivity threshold
    {
      if (PRINT)                    // ...and if the PRINT flag is set...
      {
        Serial.print("A: ");        // ...then print the values.
        Serial.print(aVal);
        Serial.print("\t");
        Serial.print("B: ");
        Serial.print(bVal);
        Serial.print("\t");
        Serial.print("C: ");
        Serial.println(cVal);
        PRINT = 0;
      }
    }
    else
    {
      PRINT = 1;  // Re-set the flag
    }
    prevCheckSum = checkSum;  // Update the values

    if (DEBUG)   // If we want debugging output as well...
    {
      Serial.print(checkSum);
      Serial.print("<=>");
      Serial.print(prevCheckSum);
      Serial.print("\tPrint: ");
      Serial.println(PRINT);
    }
  }
}
My Special Code - The Chasing Rainbow (1 pot, 3 LEDs):
/*
Uses one pot to light 3 LEDs in succession - the pot determines the rate of the progression.
*/
int potPin = 0; // select the input pin for the potentiometer
int ledPin1 = 9; // select the pin for the LED1
int ledPin2 = 10; // select the pin for the LED2
int ledPin3 = 11; // select the pin for the LED3
int val = 0; // variable to store the value coming from the sensor
void setup() {
pinMode(ledPin1, OUTPUT); // declare the ledPin1 as an OUTPUT
pinMode(ledPin2, OUTPUT); // declare the ledPin2 as an OUTPUT
pinMode(ledPin3, OUTPUT); // declare the ledPin as an OUTPUT
}
void loop() {
val = analogRead(potPin); // read the value from the sensor
digitalWrite(ledPin1, HIGH); // turn the ledPin1 on
delay(val); // stop the program for some time
digitalWrite(ledPin1, LOW); // turn the ledPin1 off
delay(val); // stop the program for some time
digitalWrite(ledPin2, HIGH); // turn the ledPin2 on
delay(val); // stop the program for some time
digitalWrite(ledPin2, LOW); // turn the ledPin2 off
delay(val); // stop the program for some time
digitalWrite(ledPin3, HIGH); // turn the ledPin3 on
delay(val); // stop the program for some time
digitalWrite(ledPin3, LOW); // turn the ledPin3 off
delay(val); // stop the program for some time
}