Description
I modified the Spring example from Processing to accept input from Arduino board. Instead of using mouse, I used the force sensor to compress the spring. Upon releasing the force sensor, the spring will rebound, acting much like what a real spring would do.
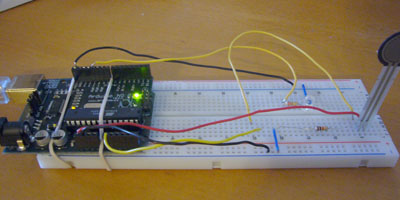
Component
1.Arduino board
2.White breadboard
3.Red LED (connects to pin11)
4.220-OHM resistors (labeled as red-red-brown-gold)
5.Wires connect LED to Arduino board (black and short blue ones connect to ground, and yellow one connect LEDs and the resistors to the pin)
6.FSR (Force Sensitive Resistor)
7.10K resistor (labeled using brown, black orange and gold bands)
8.Wires connect FSR to Arduino board (black one and short blue ones connect 10K resistor to ground, red one connects to 5V, and yellow ones connect to pin 0 )
9.2 rubber bands
10.USB cable
11.Arduino environment
12.Processing environment
Arduino Code
Down load from course website.
/*
* Resistive Sensor Input
* Takes the input from a resistive sensor, e.g., FSR or photocell
* Dims the LED accordingly, and sends the value (0-255) to the serial port
*/
int sensorPin = 0; // select the input pin for the sensor
int ledPin = 11; // select the output pin for the LED
int val = 0; // variable to store the value coming from the sensor
void setup() {
Serial.begin(9600);
}
void loop() {
val = analogRead(sensorPin); // read the value from the sensor, 0-1023
analogWrite(ledPin, val/4); // analogWrite (dimming the LED) can be between 0-255
Serial.println(val/4); // writing the value to the PC via serial connection
delay(50); // rest a little...
}
Processing Code
Modified from Spring example
/*
* CustomSpring (modified from Spring example)
*
* Press the FSR to compress the spring; release FSR will release
* the spring and let it bounce
*
* Sept 26, 2007 by Emelie Cheng
*
*/
import processing.serial.*;
// for serial comm with Arduino board
String portname = "COM7";
Serial port;
String buf = "";
int cr = 13;
int lf = 10;
// Spring drawing constants for top bar
int s_height = 16; // Height
int left = 50; // Left position
int right = 150; // Right position
int max = 100; // Maximum Y value
int min = 20; // Minimum Y value
boolean over = false; // If mouse over
boolean move = false; // If mouse down and over
// Spring simulation constants
float M = 0.8; // Mass
float K = 0.2; // Spring constant
float D = 0.92; // Damping
float R = 50; // Rest position
// Spring simulation variables
float ps = 50.0; // Position
float vs = 0.0; // Velocity
float as = 0; // Acceleration
float f = 0; // Force
float incr = 1.0; // increment
void setup()
{
size(200, 200);
rectMode(CORNERS);
noStroke();
port = new Serial(this, portname, 9600);
}
void draw()
{
background(102);
updateSpring();
drawSpring();
}
void drawSpring()
{
// Draw base
fill(0.2);
float b_width = 0.5 * ps + (-8);
rect(width/2 - b_width, ps + s_height, width/2 + b_width, 180);
// Set color and draw top bar
if(over || move) {
fill(255);
} else {
fill(204);
}
rect(left, ps, right, ps + s_height);
}
void updateSpring()
{
// Update the spring position
if(!move) {
f = -K * (ps - R); // f=-ky
as = f / M; // Set the acceleration, f=ma == a=f/m
vs = D * (vs + as); // Set the velocity
ps = ps + vs; // Updated position
}
if(abs(vs) < 0.1) {
vs = 0.0;
}
// Test if mouse is over the top bar
if(mouseX > left && mouseX < right && mouseY > ps && mouseY < ps + s_height) {
over = true;
} else {
over = false;
}
if (move) {
ps += incr;
if (ps < min) { ps = min; } // this shouldn't happen since we don't pull the spring anymore
if (ps > max) { ps = max; }
}
}
void serialEvent(Serial p)
{
int c = port.read();
if (c != lf && c != cr) {
buf += char(c);
}
if (c == lf) {
int val = int(buf);
println("val="+val);
if (val == 0)
move = false;
else {
move = true;
if (val < 128)
incr = 1;
else
incr = 2;
}
buf = "";
}
}
Photograph

Video
Please click here to view the video!
Please click here to view the video!
